Monday, January 31, 2011

TSSC159 Vintage Vogue Friends


I love great sketches and this one definitely qualifies! Mary Jo has a new sketch every Monday for her Monday Lunchtime Sketch challenge. I don't know how she comes up with them, but she does a great job.

I used this sketch to make a more serious card. It uses the vintage style that is very popular right now. I love all of the different layers and textures. The flowers are put on with Stampin' Dimensionals so they stand up from the card giving it even more dimension. I hope you like it.

Happy Stamping!
 
(Stamp quietly, please. There is a sleeping wiener dog on my lap.)
I used the following Stampin Up products to make this card:
 
Vintage Vogue Stamp Set
Marina Mist, Night of Navy, Pale Plum and Elegant Eggplant Classic Inks
Naturals Ivory, Bashful Blue, Marina Mist, Pale Plum and Elegant Eggplant Card Stock
Paper Snips
Stampin' Dimensionals
Vintage Wallpaper Textured Impressions Embossing Folder
Big Shot


Friday, January 28, 2011

SFF Upsy Daisy


It's Friday! You have made it through another week. Now, I know you're looking at the sketch for today below and my card above and are probably wondering if I put my contacts in before I decided that this card was based on this sketch. Don't worry. If I didn't have my contacts in, I wouldn't be able to find the computer.


The great thing about sketches is that you can make them your own. So, for this one, I flipped the sketch on it's side. The ribbon is now the long strip of paper on the left side. Now, I still don't have the little circle piece, but everything I tried made the left side look too heavy. But, at least you can see how I came up with this card for this sketch.
My challenge for you is this- look for a sketch this week and see what you could do with it if you flipped it on it's side or upside down. They are made to be used in whatever direction works!

Happy Stamping!
I used the following Stampin' Up products to make this card:
 
Upsy Daisy and Trendy Trees Stamp Sets and Sanded Background Stamp
Regal Rose and Garden Green Classic Inks
Regal Rose and Garden Green Stampin' Write Markers
Very Vanilla, Regal Rose, and Garden Green Card Stock
1 1/4" Striped Pretty in Pink Grosgrain Ribbon

Now check out the card Deb Currier made with this sketch here. Then, make your own card and upload it to http://www.sketchfrenzyfriday.com/.


Wednesday, January 26, 2011

Every Little Bit "September" Directions


Ahh...September. Back to School. I taught elementary school for eight years. I admit, when I walk past the school supply aisle, I miss it a little. Of course, the school supplies are out in July, but that doesn't matter. I still miss the excitement of "Back to School" time. As a result, September had to use the school bus from "Every Little Bit." I hope you enjoy it!
Happy Stamping!


I used the following Stampin' Up products to make the September picture:

Every Little Bit and Full Calendar Stamp Sets
Real Red, Daffodil Delight, and Basic Grey Classic Ink Pads
Black Stazon Ink
Very Vanilla, Naturals Ivory, Real Red, Daffodil Delight, Crumb Cake, and Basic Black Card Stock
Blender Pens
Scallop Square Extra-Large Punch
Modern Label Extra-Large Punch
Magnetic Movers and Shapers Punch Windows Set of 4
Big Shot
1/8" Real Red Taffeta Ribbon


Directions

1. Cut a piece of Naturals Ivory Card Stock to 2 3/4" x 3 3/4" for the background.
2. Stamp "September" on a piece of Crumb Cake Card Stock.
3. Punch it out using the Modern Label Extra Large Punch.
4. Cut another Modern Label from the Magnetic Movers and Shapers Punch Windows.
5. Layer the two pieces onto each other and adhere them to the background.
6. At the bottom of the background paper, stamp two school busses with Black Stazon ink.
7. Cut a piece of Very Vanilla Card Stock in a 1" square.
8. Stamp another school bus on it with Black Stazon ink.
9. Color the school busses using blender pens and the Real Red, Daffodil Delight, and Basic Grey classic inks.
10. Cut a piece of Real Red Card Stock in a 1 1/4" square.
11. Punch a piece of Daffodil Delight Card Stock with the Scallop Square Extra Large Punch.
12 Layer the school bus onto the Real Red square and the Real Red Square onto the Daffodil Delight Scallop Square.
13. Adhere the Daffodil Delight Scallop Square onto the background Card Stock.
14. Tie a small bow with the 1/8" Real Red Taffeta Ribbon.
15. Using the 2-Way glue pen, adhere the bow onto the Scallop Square.
16. You did it!

Monday, January 24, 2011

TSSC158 Punch Bunch


I make my cards and put them on my blog anywhere from a day to weeks before you actually see them. So this card wasn't actually made on January 24th. I tell you that so I can ask you this.

Have you ever had one of those days where more seems to go wrong than right?
 
Today has been that day for me. I could list one thing after another that I did today that did not work. I won't because I don't want to remember them and I don't want to bore you. It was just "one of those days."
Fortunately, I don't have them very often. I can't even remember the last one like this I had, which is a blessing.

But, these wide eyed, shocked little owls seem ironically appropriate because I'm pretty sure if something did go right tonight, I would be a little surprised. I might even be astonished.

Tomorrow is a new day. I can hardly wait for it. :)

Happy Stamping!
(I will not be using red ink because I know it would end up face down on my beige carpet.)
 
I used the following Stampin' Up products to make this card:
 
Sale-a-bration Stamp Set Punch Bunch
Full of Life Stamp Set
Melon Mambo, Tempting Turquoise, and Basic Black Classic Inks
Melon Mambo and Tempting Turquoise Stampin' Write Markers
Whisper White, Melon Mambo, and Daffodil Delight Card Stock
Brights Patterns Designer Series Paper Stack
Melon Mambo Pompom Trim
Brights Brads
Circle and Owl Punch


Friday, January 21, 2011

SFF Just Believe


It's that time again! Time for another Sketch Frenzy Friday card.
You'll notice that my scallop border goes the opposite way of the sketch, but that's the best thing about sketches. You can follow them perfectly, or switch them to fit your needs or style. I switched my scallops so they didn't cover up my flowers.
Speaking of flowers, after creating my card background, I wanted to make it stand out a little bit. So, I stamped more flowers and cut them out. Then I put them on with Stampin' Dimensionals. This gives them a little bit of height and makes the card a little more interesting.
I hope you like it!

Happy Stamping!

I used the following Stampin' Up products to make my card:

Just Believe Stamp Set
Bashful Blue, More Mustard, and Chocolate Chip Classic Ink
More Mustard and Garden Green Stampin' Write Markers
Naturals Ivory, More Mustard, and Garden Green Card Stock
Circle Punches
Paper Snips
Stampin' Dimensionals

Now, follow our blog hop by going to Deb Currier's blog. Then, create your own card based on this sketch and upload it to http://www.sketchfrenzyfriday.blogspot.com/.


Wednesday, January 19, 2011

Every Little Bit "August" Directions


August makes me happy! I should clarify- in this picture, not where I live!
I live in southern Arizona. In August, it's 112 here. I hate that with a passion.
It was better this year. My body is adjusting. I haven't decided if that's good or not, because now I freeze when it's 60 degrees out. So that August makes me unhappy.

The smiling sunshine August makes me very happy! How can you resist his smiling little face?!

Happy Stamping!


I used the following Stampin' Up supplies to make the August picture:

Every Little Bit and Full Calendar Stamp Sets
Daffodil Delight and Basic Black Classic Inks
Black Stazon Ink
Very Vanilla, Naturals Ivory, Daffodil Delight, So Saffron, Crumb Cake and Basic Black Card Stock
Paper Snips
Crystal Effects
Blender Pens
1" and 1 1/4" Circle Punches
Modern Label Extra Large Punch
Magnetic Movers and Shapers Punch Windows Set of 4
Circles #2 Die
Big Shot


Directions

1. Cut a piece of Naturals Ivory Card Stock to 2 3/4" x 3 3/4" for the background.
2. Stamp "August" on a piece of Crumb Cake Card Stock.
3. Punch it out using the Modern Label Extra Large Punch.
4. Cut another Modern Label from the Magnetic Movers and Shapers Punch Windows.
5. Layer the two pieces onto each other and adhere them to the background.
6. Stamp the sunshine onto a piece of Very Vanilla Card Stock using Black Stazon Ink.
7. Using a blender pen, color in the sunshine using Daffodil Delight Classic Ink. You can layer the color so some of the rays look darker than the others.
8. Cut out the sunshine.
9. Punch a 1" circle from Daffodil Delight Card Stock.
10. Punch a 1 1/4" circle from So Saffron Card Stock.
11. Cut a 1 1/2" circle with the Circle #2 Die from Daffodil Delight Card Stock.
12. Layer and adhere the circles on top of each other.
13. Adhere the sunshine to the top circle.
14. Put Crystal Effects over all of the circles and the sunshine. I like to lay mine on waxed paper before doing this. It will take several hours to dry. Be sure to lay it somewhere where it will not be bumped or have other things put on top of it. (I know this from experience!)
14. Randomly cut long skinny triangles out of Daffodil Delight and So Saffron Card Stock.
15. Place them in a "circle"
16. When your Crystal Effects circles are dry, adhere them over the triangle rays.
17. You did it!

As always, I hope I didn't leave anything out! Just 4 more months to go!

Monday, January 17, 2011

TSSC157 & SRC54 Pun Fun Share

Happy Monday! That means it's time for another one of Mary Jo's great Monday Lunchtime Sketch Challenges. You can check them out here. I got my inspiration for the colors of my card from Stampin' Royalty's Challenge #54. You can check out their blog here.


This was my first version of the card. It matches the sketch but I still thought mine looked a little plain.


So, here's my second version. I added ribbon along the green cardstock, although it's hard to see because the circles are close together. However, the big bow on the top is quite obvious! :) It just made the card a little more fancy.


The original sentiment with the mug says, "Love you a latte!" However, what I really needed was a "thank you" card. So, I used "thanks" from one set and added it to "a latte!" Look for ways to see and use your "old" stamps in a new way!


I used the following Stampin' Up products to make this card:

Pun Fun and Three Little Words Stamp Sets
Old Olive, Marina Mist, and Concord Crush Classic Inks
Old Olive, Marina Mist, Concord Crush, and Crumb Cake Stampin' Write Markers
Certainly Celery, Old Olive, Bashful Blue, Marina Mist, Perfect Plum, and Concord Crush Card Stock
Blender Pens
Circle Punches
1/4" Old Olive Grosgrain Ribbon
Perfect Polka Dots Textured Impressions Embossing Folder
Big Shot
Stampin' Dimensionals


Saturday, January 15, 2011

SU Stars Blog Hop "Be My Valentine" MM173 & PP29


Welcome to the January SU Stars Blog Hop!

You probably arrived from Veronica Miller's blog, Bluegrass Stamper Studio. If not, you can see the tour from the beginning by going to the SU Stars Home Page.

I'm featuring a Valentine Card on my stop. I knew I wanted to make a "fancy" card for the blog hop since I usually lean towards simple cards. While looking for a sketch to follow online, I found this one by Mojo Monday.


I turned it on it's side and this was the card I created.

Since Valentine's Day is coming, there are a lot of challenges out there for Valentine's Cards. I also chose to enter my card on The Paper Players Theme Challenge, PP29.

I hope you enjoy it!

Happy Stamping and Happy Valentine's Day!


I used the following Stampin' Up products to make this card:

Be My Valentine Single Stamp
Real Red Classic Ink
Very Vanilla, Naturals Ivory, Real Red, Crumb Cake, and Chocolate Chip Card Stock
Two-Step Owl Extra-Large Punch
Brights Brads
1 1/4" Real Red Striped Grosgrain Ribbon
Paper Snips
Stampin' Dimensionals

Now, to follow on the SU Stars blog tour, check out Courtney Johnston's blog, Brighten Your Day the Stampin' Up Way.


Friday, January 14, 2011

SFF and Just Add Ink #51 Challenges with Every Little Bit


Happy Sketch Frenzy Friday!

I made this card, which could easily be turned into a Valentine card, for a special family to me. They've taken me under their wing. The wife, especially, goes out of her way to do sweet things for me all the time. While I am busy taking care of others, she takes care of me. She bought me a study Bible for home. She bought me gift cards for me to use to take my parents out for dinner. She, her son and daughter bring me "foo foo" coffee on Sunday mornings. Best of all, she hides my gray hair. I typed it right. She hides my one gray hair. :0)

I know the men in the family would probaby like a manly card, but at the rate they're going, I'll have the chance to make that one, too.

So thank you to that special family...
from the bottom of my heart.


I used the following Stampin Up products to make this card:
 
Every Little Bit and Family Phrases Stamp Sets
Pink Pirouette, Real Red, and Basic Black Classic Inks
Whisper White, Pink Pirouette, Regal Rose, and Real Red Card Stock
Brights Patterns and Play Date Designer Series Papers
Circle Punches and 1 3/4 Scallop Circle Extra Large Punch
3/8" Taffeta Pretty in Pink Ribbon

Now check out Deb's card she made with the same sketch here. Then, make your own card and upload it to the http://www.sketchfrenzyfriday.blogspot.com/ blog.
Because this card is monochromatic, it also fits the Just Add Ink #51 Theme Challenge. You can see more monochromatic cards here.


Wednesday, January 12, 2011

Every Little Bit "July" Directions


Welcome to my Every Little Bit Tutorial! If you're making the blocks along with me, "Congratulations!" After today, you'll be more than halfway finished!
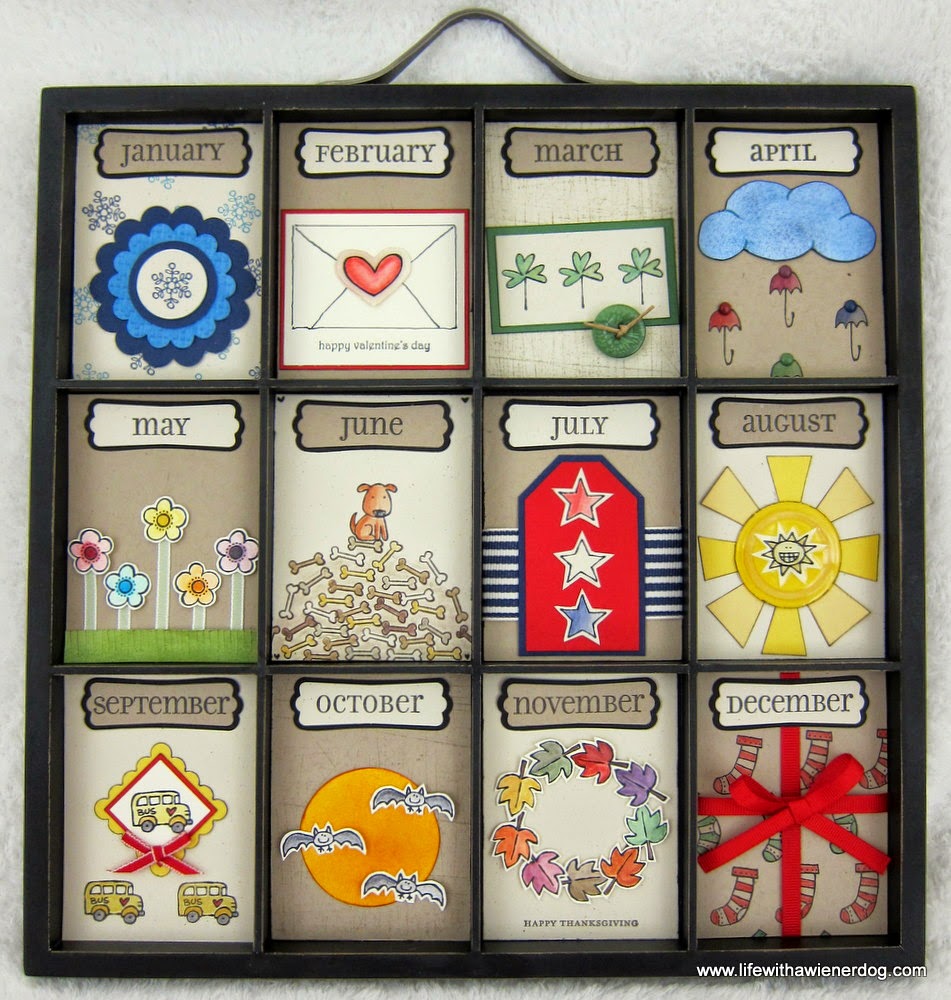
July is actually the first month I designed. Originally, I knew I wanted the three stars to be right down the middle. However, after I colored and cut them out, I realized they needed a lot more than just three stars! So the block with the ribbon, tag, and three stars became the final creation. I hope you like it!

Happy Stamping!


I used the following Stampin' Up products to make July's picture:

Every Little Bit and Full Calendar Stamp Sets
Cherry Cobbler, Night of Navy, and Basic Black Classic Inks
Black Stazon Ink
Very Vanilla, Naturals Ivory, Cherry Cobbler, Crumb Cake, Night of Navy, and Basic Black Card Stock
Modern Label Extra Large Punch
Magnetic Movers and Shapers Punch Windows Set of 4
Big Shot
Blender Pens
1 1/4" Night of Navy Striped Grosgrain Ribbon
Paper Snips


Directions

1. Cut your Crumb Cake Card Stock to 2 3/4" x 3 3/4" for the background.
2. Stamp "July" on Naturals Ivory Card Stock.
3. Punch it out with the Modern Label Extra Large Punch
4. Punch out a piece of Basic Black Card Stock with the Magnetic Movers and Shapers Modern Label shape.
5. Layer the two Modern Label Shapes and adhere them to the Crumb Cake background.
6. Stamp 3 stars with Black Stazon Ink onto Very Vanilla Card Stock.
7. Using a blender pen, color one in with Cherry Cobbler classic ink and another with Night of Navy classic ink. Leave one plain.
8. Cut each of the three stars out.
9. To make your tag, cut a piece of Cherry Cobbler Card Stock to 2 1/2" x 1 1/2".
10. Cut off two of the corners of the rectangle to form a tag shape.
11. Cut a piece of Night of Navy Card Stock to 2 3/4" x 1 3/4".
12. Cut off two of the corners of the navy rectangle to form a tag shape.
13. Adhere the Cherry Cobbler and Night of Navy tag to each other.
14. Adhere your three stars in a vertical row onto the tag.
15. Adhere the 1 1/4" Night of Navy Striped Grosgrain Ribbon to the Crumb Cake background.
16. Adhere your tag on top of the ribbon.
17. You did it!

There are a lot more steps to write out than you would first think for these tutorials. If I leave something out or you have a question, feel free to let me know!

Sunday, January 9, 2011

TSSC156 Funky Four


Last Friday, I told you about the bad things that had happened in Arizona. Little did I know, it would only get worse.
The horrible shootings in Tuscon have left us all shocked and saddened. My prayers are with the victims, their families, and the many people who will be traumatized by the things they saw. Life is so precious and can yet it can be so taken for granted.

And yet, in spite of the horrible things that happened, there are stories of courageous heroism. I've noticed all of the heroes say they are not the heroes and point the finger to someone else. I think that proves they are the heroes.

So, in honor of the good things that happen, even in the midst of the terrible ones, I've made this card.
Please keep Arizona and the many who are hurting in your thoughts and prayers.

Angela

 
I made this card for Mary Jo's Monday Lunchtime Sketch Challenge you can see on her blog here.
 

I used the following Stampin Up products to make it:

Funky Four Stamp Set
Real Red, Daffodil Delight, Old Olive Tempting Turquoise, and Chocolate Chip Classic Inks
Real Red, Tempting Turquoise, and Chocolate Chip Card Stock
Play Date Designer Series Paper
1/4" Real Red Grosgrain Ribbon


Friday, January 7, 2011

SFF Sunny Garden


It's been a long week in Chandler, Arizona. Yesterday, there was a shooting at our mall which led to a hostage standoff in a restaurant nearby. Thankfully, it ended without anyone being hurt.
 
Unfortunately, the other situation we have faced this week did not end as well. A girl who grew up in our church and her fiance both passed away this week. They had recently gotten engaged and went to Puerto Rico so she could meet his family. At the dinner table on New Year's Day, an uncle douced the family members with some kind of fuel and then sat them, the table, and the rest of the house on fire. Nine were burned severly. Five of those have passed away, including Kate from our church. It was such a senseless, horrific crime. I am asking for you to please keep the Kate Donahue and Jesus Sanchez family in your prayers. Four of his family members are still fighting for their lives. Neighbors who witnessed the family members running from the home have been traumatized. Puerto Rico as a whole is in mourning, as they do not usually have such violent crimes as this. Please keep everyone affected by this tragedy in your prayers, as well.

With all of that, it might seem odd that I would make a joyful looking card with happy colors. We've heard it said before, but life is short. We tend to think we have all the time in the world with our loved ones. The truth is that change and loss can happen in an instant.

So, enjoy the flowers and the butterflys. Let the people you are thinking of know it.

With thoughts and prayers for the many hurting today,

Angela
 

I used the following Stampin' Up products to make this card:
 
So Happy For You Stamp Set (soon to be available as a Sale-a-bration set)
Whisper White, Peach Parfait, and Pear Pizzaz Card Stock
Sunny Garden Designer Series Paper
Gold Brads
1/2" Poppy Parade Stitched-Poly Ribbon

Now visit Deb's blog for another great card based on this sketch.
Make your own and upload it to http://www.sketchfrenzyfriday.blogspot.com/


Wednesday, January 5, 2011

Crazy for Cupcakes Birthday Cards


If you saw my blog post on Sunday, you know I love my leaders that I work with at church. So, I decided I'd make them birthday cards this year. I don't think any of them get on my blog, so I'm sharing the cards I made for the three January birthdays this year. I was happy with how they turned out and hope they like them.

Happy Stamping!

I used the following Stampin' Up products to make these cards:
 
Crazy for Cupcakes and Full of Life Stamp Sets
Poppy Parade, So Saffron, Pear Pizzaz, Tempting Turquoise, and Basic Black Classic Inks
Whisper White, Poppy Parade, So Saffron, Pear Pizzaz, and Tempting Turquoise Card Stock
Build-A-Bear Workshop Pawsitively Prints 2 Designer Series Paper
Blender Pens
1/2" Poppy Parade Stitched-Poly Ribbon
Illuminate Top Coat Smooch Pearlized Accent Ink (to make the cupcakes frosting and candle flame shiny)


Every Little Bit "June" Directions


I admit it. June is my favorite. In the "Every Little Bit" stamp set, there are other stamps that could be used for June. The hammer and nails could be used for Father's Day. Bubble gum could be used for "schools out- let the fun begin." But, when picking the month of June, I had to go with the dog.

You see, Frank's birthday is June 30th. This picture would be his birthday wish come true- him, sitting on a huge pile of bones. Frank loves a good bone. He doesn't rush into them. First, he sniffs a new one. Then, he licks it once. Then, he decides if it is up to his standard. Some are, like Chewlottas and Busy Bones. Some are not, although I won't post which he turns his nose up when offered.

So June is for Frank. A lady at work said, "Oh, the dog days of summer!" That is clever, but I didn't think of that one on my own. However, if you choose to use the dog for June, feel free!


These are the Stampin' Up products I used to make the June picture:

Every Little Bit, Full Calendar, and Friends Fur-ever Stamp Sets
Cajun Craze, Sahara Sand, Crumb Cake, Early Espresso, and Basic Black Classic Inks
Basic Black Stampin' Write Marker
Black Stazon Ink
Naturals Ivory, Crumb Cake, and Basic Black Card Stock
Modern Label Extra Large Punch
Magentic Movers and Shapers Punch Windows Set of Four
Big Shot
Blender Pens


Directions:

1. Cut a piece of Naturals Ivory Card stock to 2 3/4" x 3 3/4".
2. Stamp "June" on the Crumb Cake Card Stock in Basic Black ink.
3. Punch it out with the Modern Label Punch.
4. Cut the Modern Label shape out of the Magnetic Movers and Shapers Punch Windows in Basic Black Card stock.
5. Adhere the Modern Label pieces to the Naturals Ivory Card Stock.
6. Stamp the bone from "Friends Fur-ever" over and over to make a pile in Black Stazon ink. I started at the bottom and randomly worked my way up.
7. Color the bones with Sahara Sand, Crumb Cake, and Early Espresso inks with blender pens. Don't color all of the bones so you have some in the Natural Ivory color as well.
8. Stamp the dog on top of the pile of bones.
9. Color the dog with Cajun Craze ink with a blender pen.
10. Draw four little hearts in the corners of the background paper.

June is much less time consuming than some of the other months. I hope you enjoy it.

Happy Stamping!

Tuesday, January 4, 2011

Morning Cup and the New Love of My Life


Now, don't panic. I'm not about to change the name of my blog to "Life with a Tassimo." However, if Frank could make me coffee in the morning, he would be perfect. He will stand beside me while my machine does the work, though, so I think he's doing the best he can and deserves credit for his efforts.


Meet my Tassimo. I love it. My Tassimo is a genius. It knows what I want it to fix me in the morning. You see, I put in fresh water and a little coffee pod. My machine reads the pod so it knows if I'm going to want cappuccino, espresso, tea, coffee, hot chocolate, or other drinks! I'm not a huge coffee drinker, but I love cappuccinos and lattes. So, in the picture above, my coffee maker is fixing me an espresso (which is how all lattes and cappuccinos start out.)


Then, it reads the milk pod and steams milk for my drink. Normally, I'd do it in a mug, but for your viewing pleasure, I did it in a glass one.

And there is my rich, frothy cappuccino. I have a wide variety of sugar free coffee syrups so I can make flavored drinks. My favorites have to be Almond Hot Chocolate (soooo goood!) and Almond Cinnamon Cappuccino.
So, in honor of my Tassimo, I have made this card. Although I don't make a lot of tea in it, it is definitely "tea"riffic.
Happy Stamping!

 
I used the following Stampin' Up products to make this card:
 
Morning Cup Stamp Set and Sanded Background Stamp
Cherry Cobbler, Baja Breeze, Night of Navy, and Basic Black Classic Inks
Very Vanilla, Cherry Cobbler, Baja Breeze, and Not Quite Navy Card Stock
Victoria 5/8" Crochet Trim
(I don't know why it switched to double spacing all of a sudden. Maybe it needs a cappuccino to get going.)


Related Posts Plugin for WordPress, Blogger...