Hello, Friends!
Papertrey Ink is celebrating their 10th Anniversary of being in business this month. Each day, since February 10th, they have been looking back at a specific year and the stamps that were released during that time. Unfortunately, I don't have any of their sets from that year to use for today's card. However, I still found inspiration from 2007 post.
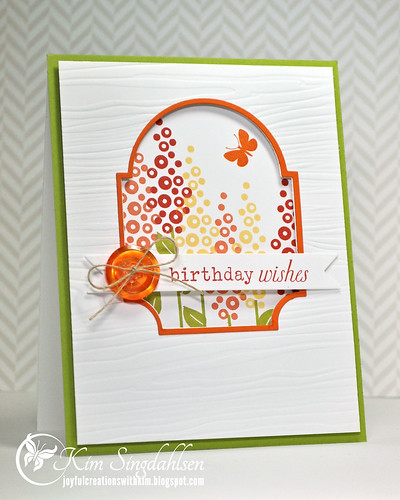
One of the sets that was released that year was Green Thumb. This is a card that PTI's customer, Kim Singdahlsen, made with it. If you'd like more information about her card, it's on her blog here. I've followed Kim's blog for a few years and her creations are great!

I had seen Kim's card on Pinterest long before it was on Papertrey Ink's website and always loved it. Today was the perfect time to use it for inspiration to make a different birthday card.
There are a lot of similarities and differences when you look closely at our two cards. You may notice that Kim used an embossing folder to add texture and interest to her white background. I decided to use PTI's Hooray patterned paper for my background.
Kim has several paper layers on the front of her card. To me, it looks like she has a white base, a green front on the base, a white piece of card stock stamped with the flowers, the orange card stock die-cut window and finally the white embossed die cut card stock on the front . My card just has a white card stock base, the yellow die-cut window layer and the patterned paper die-cut window paper as the front.
Both of our windows have a tiny colored border around the inside of them. That's because PTI has two different dies, listed below, that cut the same exact shape, but are just a tiny bit different in size. I was able to cut my smaller window out of yellow card stock and layer it under the patterned paper that cut the same shape just slightly bigger. This gave me a small yellow border inside of my main window. For a fun twist, I also used the smallest die to cut the same shape out of the white card base. This made a window all the way through the front of my card. Kim cut her smallest die out of orange paper and the larger die out of her white embossed paper to create her window with a small border inside it.
Next, I stamped this whimsical birthday cake from PTI on the inside of my card. Because the inks I used were a little light, I reinked my stamp and stamped the different layers a couple of times, directly on top of each other. With the MISTI, this was super easy and it added to the intensity of the colors of my cake and icing. The colors of the cake, icing and candle flames all match the patterned paper perfectly. However, the way the light hits the inside of the card differently than the outside, they look a little bit darker. Kim stamped her flowers and a sweet little butterfly inside her window.
Kim stamped her greeting on white card stock and added a button with twine for an embellishment to her sentiment. Instead of adding my greeting straight across the bottom on card stock like Kim did, I decided to take advantage of my window. By stamping "Happy Birthday" on vellum, I could adhere it diagonally across my window but still allow the person receiving the card to see the cake.
The cake is stamped right in the center of the window and is lined up straight, because I'm picky about those thing! It's just hard to tell when the card is propped open like it was when I took this picture.
Keep your eyes open for a lot more cards coming your way in the next couple of days featuring Papertrey Ink's wide variety of stamps! I offer a big thanks to Kim Singdahlsen for creating her wonderful card that became the inspiration for my card!
To see more cards based on Papertrey Inks stamp sets from 2007 or the Papertrey Ink post about 2007, click here.
Happy Stamping!!
I used the following products by Papertrey Ink to make this card:
Paper Clippings: Birthday Stamp Set
Keep It Simple: Birthday II Mini Stamp Set
Berry Sorbet, Lemon Tart, Summer Sunrise, Hawaiian Shores and Dark Chocolate Ink Pads
Stamper's Select White and Lemon Tart Card Stock
Hooray Patterned Paper Collection
Sheer Basics Vellum Patterned Paper Collection-
(the stripes were the perfect width for my sentiment)
Layerz Mat Stack 3 and Mat Stack 3 Dies
MISTI by My Sweet Petunia


1 comment:
Fun birthday card. Love the idea of using vellum so you can see the cake. Again, fun analysis of both cards. You really put a lot of thought into these!
Chris R. from Iowa
Post a Comment