Monday, February 28, 2011

LNS Challenge Focus on Kids


This week, in honor of Dr. Suess' birthday, the LateNightStampers Challenge is to make cards that are focused on kids. My card is based on a sketch Mary Jo featured on her Monday Lunchtime Sketch Challenge a while ago. Going back to "old" sketches always provides a source for creativity!

Happy Stamping and Happy Birthday Dr. Seuss!


I used the following Stampin' Up supplies to make this card:

Pun Fun Stamp Set
Poppy Parade, So Saffron, Pear Pizzazz, Tempting Turquoise, and Basic Black Classic Inks
Whisper White, Poppy Parade, So Saffron, and Tempting Turquoise Card Stock
Build-a-Bear Workshop Pawsitively Prints 2 Designer Series Paper
Scallop Edge Border Punch
Gold Brads
Blender Pens
Sponges

Friday, February 25, 2011

SFF and LNS Challenge with Punch Bunch


The card I made for today actually is for two different challenges. It's Friday, so the sketch comes from our Sketch Frenzy Friday challenge. I used my Big Shot for the center circle, so it also fits the LNS Challenge for this week.
I like how the card is soft and sweet for spring. I hope you enjoy it too!
Happy Stamping!

I used the following Stampin' Up products to make this card:

Punch Bunch Stamp Set and Sanded Background Stamp
Pear Pizzazz and Crumb Cake Classic Inks
Blushing Bride, Pear Pizzazz, and Early Espresso Stampin' Write Markers
Whisper White, Blushing Bride, Pear Pizzazz, Crumb Cake, and Early Espresso Card Stock
Circle Punch, 1 3/4" Scallop Circle Extra Large, and 2 3/8" Scallop Circle Extra Large Punch
Big Shot
Elegant Bouquet Textured Impressions Embossing Folder
Circles #2 Original Big Shot Die
1/8" Early Espresso Taffeta Ribbon


You can see another card made with this sketch on Deb Currier's blog here. Then make your own and show us at www.sketchfrenzyfriday.blogspot.com.

Wednesday, February 23, 2011

LNS Challenge- Big Shot


This is my card for this week's LateNightStamper's Challenge.
We're featuring projects made with the Big Shot this week.
This is a technique I have seen other stampers use, but I had never used it myself.
The person who thought of it was a genius!

I took Very Vanilla Cardstock as my original background and adhered the different punches to it. Then, I put it inside an embossing folder and ran it through my Big Shot. I love it because it reminds me of a quilt. It looks very difficult, but it's not at all. Now that I've tried it once, I'll be using it again and again!
Break out your Big Shot and get creative!
 
Happy Stamping!

I used the following Stampin' Up products to make this card:

Very Vanilla, Bashful Blue, Marina Mist, and Night of Navy Card Stock
Boho Blossoms Extra-Large Punch
1 1/4" Striped Night of Navy Grosgrain Ribbon
Big Shot
Square Lattice Textured Impressions Embossing Folder

Monday, February 21, 2011

TSSC162 Pun Fun


This was a super simple card to make for a special girl at our church. I had been writing recommendation letters for her for college and scholarships. I had joked with her that if she didn't get one of them, I was going to have to come up with the money to to send her to college! Luckily for us both, she got into the school she wanted with a large scholarship!
I know she's a "grown-up," but I thought this was a fun card for her. I made it using Mary Jo's Monday Lunchtime Sketch Challenge pattern. I hope you enjoy it!
 
Happy Stamping!
 
I used the following Stampin' Up products to make this card:
Pun Fun and FYI Stamp Sets
Melon Mambo, Tempting Turquoise, Rich Razzleberry, and Basic Black Classic Inks
Whisper White, Melon Mambo, and Rich Razzleberry Cardstock
Brights Designer Series Paper
Blender Pens
Word Window Large and Modern Label Extra-Large Punches


Saturday, February 19, 2011

SU Stars Blog Hop "Punch Bunch"


Welcome to the SU Stars February Blog Hop, Everyone!
The blog hop starts on the SU Stars Homepage. You can find it here.
You're going to want to check out everyone's cards because we have amazing ladies featured this month.

My card features the "Happy Birthday" and "Sale-a-bration" theme of our tour.

Obviously, it's a birthday card. I also used a Sale-a-bration stamp set, Punch Bunch, and the Ice Cream Parlor Designer Series Paper and Quick Accents Pack to make it. It's a happy, little card and if you have followed my blog for long, you know those are my favorites!

Happy Stamping and Enjoy the Hop!
 
I used the following Stampin' Up products to make this card:

Punch Bunch Sale-a-bration Stamp Set
Party Hearty Stamp Set
Melon Mambo, Daffodil Delight, and Pacific Point Classic Inks
Whisper White, Melon Mambo, Daffodil Delight, and Pacific Point Card Stock
Ice Cream Parlor Designer Series Paper and Quick Accents Sale-a-bration Pack
Scallop Square Extra-Large and Large Tag Punch
Melon Mambo Pompom Trim

Now, go to Diana Soling's blog, Stamping My Life Away, to see her project and follow the tour!

Friday, February 18, 2011

SFF Sale-a-bration Card


My card for this Sketch Frenzy Friday sketch features a lot of free items. Who doesn't like free?! I used the Punch Bunch set for the "Happy Birthday" stamp. The flowered patterned paper, flowers, and large colored polka dots were also free in the Ice Cream Parlor Designer Series Paper and Quick Accents Pack. Why were they free, you might be wondering? It's Sale-a-bration time! You can earn each of these items with a $50 order. If these don't suit you, there are other sets, embellishments, a CD of Stampin' Up artwork, and more to choose from. If you're interested in placing an order, drop me an email. They're available until March 31st.
 
Happy Stamping!
 

I used the following Stampin' Up items to make this card:
 
Punch Bunch Stamp Set
Melon Mambo Classic Ink
Melon Mambo, Daffodil Delight, and Pacific Point Card Stock
Bright Patterns Designer Series Paper Stack
Ice Cream Parlor Designer Series Paper and Quick Accents Pack
Circle Punch and Scallop Square Extra Large Punch
 
Now to see another card made with this sketch, go to Deb Currier's blog here. Then make your own and show us at www.sketchfrenzyfriday.blogspot.com.

Wednesday, February 16, 2011

Every Little Bit "December" Directions


We did it! If you've been following along each week, this will complete your calendar! Be sure you send me pictures so I can see your finished designs. Even following the same directions, we'll all get something a little bit different.

Let's get to it! Here are the final directions for December.
Happy Stamping!


I used the following Stampin' Up supplies to make the December picture:
"Every Little Bit" and "Full Calendar" Stamp Sets
Real Red, Garden Green, and Basic Black Classic Inks
Black Stazon Ink
Naturals Ivory, Crumb Cake, and Basic Black Card Stock
Modern Label Extra-Large Punch
Movers and Shapers Punch Windows Set of 4
Big Shot
Blender Pens
1/4" Real Red Grosgrain Ribbon


Directions:

1. Cut a piece of Crumb Cake Card Stock to 2 3/4" x 3 3/4" for the background.
2. Stamp "December" using Basic Black ink on a piece of Naturals Ivory Card Stock.
3. Punch it out using the Modern Label punch.
4. Cut another Modern Label from Basic Black Cardstock using the Movers and Shapers Punch Window set.
5. Layer the two pieces on top of each other.
6. Using Black Stazon ink, stamp the stockings in a pattern on the Crumb Cake background.
7. Color them using Real Red and Garden Green Classic Inks and blender pens.
8. Take the 1/4" Real Red Grosgrain Ribbon and cut a piece that is a little more than 4" long.
9. Adhere this piece of ribbon from the top to the bottom of the background. (You can wrap it around to the back so there's no chance of your adhesive showing.)
10. Cut another piece of ribbon that is a little more than 3" long.
11. Adhere this piece of ribbon from side to side.
12. Cut a long piece of ribbon and tie it in a bow.
13. Adhere the bow where your other two pieces of ribbon cross.
14. Adhere "December" over the ribbon.

YOU DID IT!
Now show me those awesome projects you've been working on!


Tuesday, February 15, 2011

LNS Challenge- Masculine


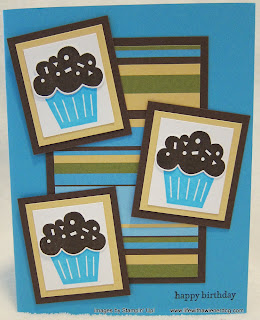
It's time for another LateNightStampers Challenge! I am so excited to be on the design team with some great stampers! This week, our challenge is to make a masculine card. I made a couple of these for two different guys that serve in our elementary ministry. One is 15 and the other will be in his 60s. Quite a stretch in ages, but I think it will work for both! I've already given the 15 year old his card and told him that I tried to make it manly. He informed me that the stripes do make it manly. I believe that makes it a success!
This card doesn't require a lot of supplies. If you're a new stamper, this is the perfect one to try!

Now go make some masculine cards for the men in your life, no matter what their ages! :)

Happy Stamping!

I used the following Stampin' Up products to make this card:

Party Hearty and Teeny Tiny Wishes Stamp Sets
Tempting Turquoise and Chocolate Chip Classic Inks
Whisper White, So Saffron, Tempting Turquoise, and Chocolate Chip Card Stock
Play Date Designer Series Paper


Monday, February 14, 2011

TSSC161 Party Hearty


Happy Monday, Everyone!
This sketch by Mary Jo for the Monday Lunchtime Sketch Challenge is a cutie! It was perfect for some birthday cards I needed. I got the color combination from my SU Color Coach. It's a lifesaver when you don't want to keep reaching for the "usuals" we tend to gravitate towards.

Happy Stamping!


I used the following Stampin' Up products to make this card:

Party Hearty, Itty Bitty Bits, and So Happy For You (a free stamp set during Sale-A-Bration!)
Pretty In Pink, Rich Razzleberry, and Early Espresso Classic Inks
Very Vanilla, Pretty in Pink, Rich Razzleberry, and Early Espresso Card Stock
Brights Patterns Designer Series Paper Stack
Itty Bitty Shapes Punch Pack
Circle Punches
SU Color Coach


Friday, February 11, 2011

SFF Fast and Fabulous


Happy Friday, Everyone!

I made this birthday card for a special lady at work. She knows that I'm sending all of my leaders handmade birthday cards this year because she gets me the stamps for them. She wanted in on the action. I told her she'd have to volunteer for me. She pointed out that it was a special birthday- her 50th.

So, not being as tough as you might expect from my rough "Life with a Wiener Dog" exterior, I made her this card. She did volunteer for VBS with me last year and it is a special birthday, so that was close enough. :)
Now go stamp a card for a special lady in your life.
Happy Stamping!

I used the following Stampin' Up products to make this card:

Fast and Fabulous and Teeny Tiny Wishes Stamp Sets
Garden Green and Rich Razzleberry Classic Inks
Whisper White, Certainly Celery, Garden Green, and Rich Razzleberry Card Stock
Build-a-Bear Workshop Pawsitively Prints 2 Designer Series Paper
1 3/4" x 7/8" Oval Large, 1 3/8" x 5/8" Oval Large, and Scallop Oval Extra Large Punches
1/4" Rich Razzleberry Grosgrain Ribbon

You can see another sketch on Jennifer Weide's blog here. Then, make your own card and post it on http://www.sketchfrenzyfriday.blogspot.com/.

Wednesday, February 9, 2011

Every Little Bit "November" Directions


It's Wednesday and we are almost finished!

If you're just joining us, I made this calendar for my Royal Blog Tour post. I've been giving the directions for each month on Wednesdays. We are all the way up to November now!

I like all of the months, but November is one of my favorites. I like the fall colors and how the cute little wreath turned out. The directions for it are below.

Happy Stamping!

I used the following supplies to make the November picture:
Every Little Bit, Full Calendar, and Teeny Tiny Wishes Stamp Sets
Cherry Cobbler, Cajun Craze, Pumpkin Pie, So Saffron, Garden Green, Always Artichoke, Rich Razzleberry, Elegant Eggplant, Early Espresso and Basic Black Classic Inks
Black Stazon Ink
Very Vanilla, Naturals Ivory, Crumb Cake and Basic Black Card Stock
Paper Snips
Blender Pens
Modern Label Extra Large Punch
Magnetic Movers and Shapers Punch Windows Set of 4
Big Shot


Directions:

1. Cut a piece of Naturals Ivory Card Stock to 2 3/4" x 3 3/4" for the background.
2. Stamp "November" on a piece of Crumb Cake Card Stock.
3. Punch it out using the Modern Label Extra Large Punch.
4. Cut another Modern Label using the die from the Magnetic Movers and Shapers set.
5. Layer the two pieces on top of each other and adhere to the background card stock.
6. Stamp nine leaves from "Every Little Bit" onto Very Vanilla card stock using the Black Stazon ink.
7. Color them using a blender pen. I used Cherry Cobbler, Cajun Craze, Pumpkin Pie, So Saffron, Garden Green, Always Artichoke, Rich Razzleberry, Elegant Eggplant, and Early Espresso Classic Inks.
8. Cut each of the leaves out using Paper Snips.
9. Arrange them in the order you would like.
10. Adhere the leaves to the background in a circle.
11. Stamp "Happy Thanksgiving" from "Teeny Tiny Wishes" at the bottom in Early Espresso ink.
12. You're done with November. Just one more month to go!


Tuesday, February 8, 2011

LNS Challenge- Hearts Abound

This is my first post for the Latenightstampers Challenge as a member of their design team! It is such an honor and I'm very excited to be in the company of such great stampers!

This week's challenge is "Hearts Abound." To enter, you must use at least one heart on your project.

I designed this card with the "Hearts Abound" challenge in mind. It was for my parents 41st wedding anniversary. (Way to go, Mom and Dad- two of my most loyal blog followers!) I knew I wanted to use at least one heart but I didn't want it to look like it was a Valentine's Day card.

Using Baja Breeze and Night of Navy as the main color scheme helped me accomplish this.
If you'd like to join us and share your own card where "Hearts Abound," you can make one, join us and share it here!


I used the following Stampin' Up products to make this card:

Teeny Tiny Wishes Stamps
Night of Navy Classic Ink
Night of Navy Stampin' Write Marker
Very Vanilla, Baja Breeze, and Night of Navy Card Stock
Springtime Vintage Designer Series Paper
3/8" Very Vanilla Taffeta Ribbon
Magnetic Movers and Shapers Punch Windows Set of 4
Big Shot
Sponges

Monday, February 7, 2011

TSSC160 The Nicest Things


Welcome to a new week! This is my card for Mary Jo's Monday Lunchtime Sketch Challenge.

In Arizona, this is our spring. It's in the 70s and the sun is out. The sun is pretty much always out here, but for most of the rest of the country, this is significant. So, I keep leaning towards "spring" colors in my cards right now. For all of you who have been covered in snow, your spring is coming. I hope this card helps you hang on through the gray days until the sun is shining for you, too!
Happy Stamping!


I used the following Stampin' Up products for this card:

The Nicest Things and Short and Sweet Stamps
Pretty in Pink, Rose Red, Peach Parfait, So Saffron, Certainly Celery, Wild Wasabi, Baja Breeze, Rich Razzleberry, Perfect Plum, Sahara Sand, Soft Suede, and Basic Black Classic Inks
Very Vanilla, Pretty in Pink, Baja Breeze, and Perfect Plum Card Stock
Circle Punches
Blender Pens
Vintage Flower Adornments


Friday, February 4, 2011

SFF Elegant Soiree Designer Series Paper


It's Sketch Frenzy Friday time again!


It isn't often that I make a card that has absolutely no stamping on it at all. I had thought about making my own designer paper by stamping images on it and then using a print at the bottom. However, I love the Elegant Soiree paper and thought this corner with the flower would be perfect for today's card. I was going to trim it down to make it a regular sized 5 1/2" x 4" card but to do so would have meant that I would have had to cut off part of the design. So instead, I switched it to a 5 1/4" x 5 1/4" card. It was super fast, super simple, and I still think it's pretty.

Happy Stamping!


I used the following Stampin' Up products to make this card:
 
Very Vanilla and Baja Breeze Cardstock
Elegant Soiree Designer Series Paper
5/8" Very Vanilla Grosgrain Ribbon
That's it!


To see another card with this sketch, check out Deb Currier's blog here. Then make your own card with this sketch and upload it to http://www.sketchfrenzyfriday.com/.


Wednesday, February 2, 2011

Every Little Bit "October" Directions


October is one of my favorite months on this project that I made for the Royal Blog Tour. I think it's because the bats are sooo cute! They have such happy little faces and are anything but scary for Halloween, even if they are flying in front of the moon. If you've been creating the months along with this tutorial, this is an easy one! It's not nearly as time consuming as some of the other ones. I hope you enjoy it!

Happy Stamping!
 

I used the following Stampin' Up products to make October's picture:
 
Every Little Bit and Full Calendar Stamp Sets and Sanded Background Stamp
Daffodil Delight, Pumpkin Pie, Crumb Cake, and Basic Black Classic Ink
Very Vanilla, Naturals Ivory, Daffodil Delight, Crumb Cake, and Basic Black Card Stock
Black Stazon Ink
Paper Snips Scissors
Blender Pen
Sponges
Modern Label Extra Large Punch
Magnetic Movers and Shapers Punch Windows Set of 4
Circles #2 Die
Big Shot


Directions

1. Cut out your Crumb Cake Card Stock to 2 3/4" x 3 3/4" for the background.
2. Ink the Sanded background stamp with Crumb Cake Classic Ink.
3. Stamp the Sanded stamp onto the background.
4. Stamp "October" with Basic Black Ink on Naturals Ivory Card Stock.
5. Punch it out with the Modern Label Extra Large Punch.
6. Use the Magnetic Movers and Shapers die to cut out another Modern Label shape from Basic Black Card Stock.
7. Adhere the Modern Label shapes to each other and then to the Crumb Cake Background.
8. Use the Circles #2 die with your Big Shot to cut out the circle that is about 1 3/4" in diameter from Daffodil Card Stock.
9. Sponge Daffodil Delight and Pumpkin Pie Classic Inks onto the Card Stock circle to give it more depth. Run the edge of the circle along the Pumpkin Pie Classic Ink Pad to give it a defined outline.
10. Stamp 3 bats onto Very Vanilla Card Stock with Black Stazon Ink.
11. Using a blender pen, color in the bats lightly with Black Classic Ink.
12. Cut the three bats out with your Paper Snips scissors.
13. Adhere the yellow moon to the Crumb Cake background.
14. Adhere the three bats to the moon. It's okay if they stick up a little from the background piece. This makes it look like they're flying!
15. Ta Da! October is finished!

Join me again next Wednesday for November's Tutorial!

Related Posts Plugin for WordPress, Blogger...